
Hello Members! We received another fun technique from one of our members. Nicci has shared a fun handmade paper technique that creates unique final product.
---
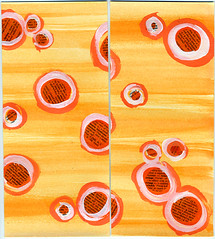
Swapped on Art42: (http://www.artfortytwo.org/projects/89) - Handmade Paper Swap
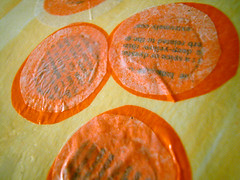
In order to make the handmade paper above, you need cardstock (white), watercolor, thinned down glue or mod podge, acrylic paint, gesso, and found papers with text.
1) First, apply rolled up tape to the back of your cardstock (or bristol board), and affix to a surface. In this case, I used folded up boxes. Apply watercolor to your paper in a streaky wash. It will still warp a little as it dries, but taping it down on the back helps minimize this.
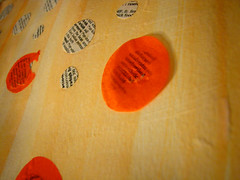
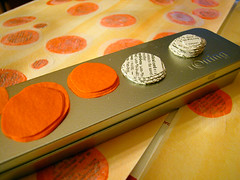
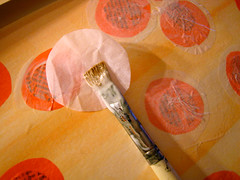
2) Cut up your tissue paper into circles which are slightly larger than circles of cut up paper with text on it. You can use dictionary pages or pages from a novel for your text. Just freehand cut your circles. They don't have to be perfect. I folded papers over several times and cut out multiple circles at once. Apply with mod podge or thinned down white glue. brush some over the top. Apply one circle or tissue over. Apply mod podge over that as well. (Tip: if you brush too many times over the wet tissue, it will tear. If it does, simply apply another circle of tissue and be more careful with that one!)
3) Step 3 is optional. If you would like to tone down the color of your tissue a little, apply a layer of white tissue over the color after refreshing the mod podge on the color (you can wait until it dries, or apply when still wet, so long as you're sure you add more glue between the two pieces. Then, apply glue over the white so it seals down well. You can also trap threads or ephemera between the layers of tissue for added interest. (Have scrap threads from sewing projects? Those are perfect!)
As you can see from the photo, a wet brush is perfect for picking up tissue paper circles. It makes the process easy and fast!
4) Once you've finished your dots, with or without the optional white layer or ephemera, allow them to dry. This should only take a few minutes.

5) Mix acrylic paint into a nice creamy consistency. Use a color similar to your tissue color, but slightly lighter or darker. Apply with a brush in loose circles around the tissue. Have fun with this! It doesn't have to be exact. In fact, it looks better if it's not!
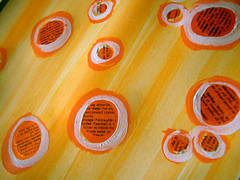
6) Mix a little gesso with water, unless it's already a creamy consistency. Repeat the process of applying circles. I like to swoop them on fast so they have a little extra energy to them. Again, you don't have to worry about perfection here. It's just for fun, and looks better streaky.
Allow this to dry, then cut up and use in other projects, or use them for ATC bases!
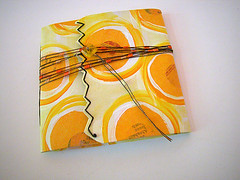
I received a paper similar to this from a paper swap a few years ago (from Kirsten W. - http://www.flickr.com/photos/kirstenwilliamson/), and made a small handmade book with it. This stuff makes a pretty nifty cover. Below you can see what her paper looked like, and what I did with it!:
xox nicci
(http://www.artfortytwo.org/profiles/nicci)
Come join some swaps!
----
If you have a technique you would like to share with the rest of the Art Forty-Two members please send it to webmaster@artfortytwo.org!
Very fun!
ReplyDeleteThese papers are awesome! Thanks for sharing the process.
ReplyDelete