Wednesday, August 18, 2010

Carnival Chunky Book Page


Artist: sfasser


Artist:Strawberry


Artist:FaithMarie


Artist: Artizlife


Monday, June 28, 2010

Art Forty-Two Anniversary Book

Hi Everyone! The book is done and ready on www.blurb.com. We hope you are all very happy with how it turned out. We like it, and are already excited to get started on next year's book!

2009-2010
By Art Forty-Two

Saturday, June 5, 2010

Art Forty-Two Anniversary Show and Swap

Art Forty-Two's first show happened today! We had a lot of fun and enjoyed spending the time staring at art, talking about art and the site, eating snacks, and basically basking in the glow of of a successful first year.

We have loved hosting the site and getting to know our members. We are looking forward to more opportunities to show your work and meet up with members for in-person swaps. Things we hope to start happening regularly as we move in to year two.

Over the next month we are going to work on putting together our Art Forty-Two Anniversary Book: Vol 1. It will include all of the work we received from members through out the year via site-hosted swaps. We've been scanning all the images just in case we decided to do something like this.

There are more pictures from the Anniversary event on Facebook. We hope that as we continue to do events like this they will get bigger and bigger each time.

We want to thank our members from the bottom of our hearts for helping us make this site everything we dreamed it would be. With out you, it would not exist.

All our love!
Sandra (FaithMarie) and Danial (Empress_Dragon)

Monday, May 3, 2010

Site Update - Exciting New Features

We've made many updates to the site this launch. A few things you will find with this new update.
  1. Forums - pretty self-explanatory. We hope you like them. We have five main forums at the moment. Art Forty-Two site news - where we will be posting news about the site, events, etc. A Member Help forum, a Trades and Exchanges forum, an art discussion forum and a general discussion forum. We will add more as needed.

  2. Project pages enhancements - we've added a tab to every project page. The tabs say "Participants" and "Discussion". As a participant you can discuss the project, ask questions, check-up etc. This is in addition to any notes you put in by editing/updating your status on the participant tab - or any left panel notes left by the host/ess.

  3. Profile pages got a new tab. Your profile page now has a new Q&A Tab. This area is your own personal "forum" where members can ask you questions, you can make notes about anything going on in your life (vacation, illness etc). and basically allows a place for you to have personal discussions.

  4. Project pages - images. We've added a spot on the project pages for an image. This will allow you to put a little eye candy on the page or to help explain what is expected of your participants. Soon, we hope to also display the images on the project page list but we ran out of time for this launch.
As always, we hope you like the changes. We'd love to hear your feedback. We make all the changes to the site we can to make using it easier for you. We love our members! Sometimes it takes us a little since we all work full-time day jobs, but hopefully, the site is bringing you some arty joy. It's certainly made out lives happier!

Art Forty-Two
Sandra and Danial
FaithMarie and EmpressDragon

Thursday, April 22, 2010

Art Forty-Two Anniversary Show and Swap

Date:
Saturday, June 5, 2010
Time:
5:00pm - 7:00pm
Location:
LA Frames
Street:
309 S 3rd St
City/Town:
Renton, WA

Art Forty-Two is a year old! We'd like to celebrate with our members at LA Frames.

We will have light refreshments, an ATC Swap and a viewing of the art sent to us by our members - including the art from the Anniversary Swap!

We hope all of you in the Washington, Oregon, Vancouver BC area can make it - (of course, if you are out of the area and want to visit we'd love to see you here too!)

Please RSVP so we know how many people to expect. You can RSVP on the Facebook event, or by e-mailing webmaster@artfortytwo.org.

Please RSVP by May 22, 2010

Also - Sign up for the Art Forty-Two Anniversary Swap and have your work to us by the due date (June 1) to have your work displayed at our event! You can send in any theme or the one suggested on the project. (Check out the project page http://www.artfortytwo.org/projects/161)

Sunday, April 18, 2010

Help us test the forums

We've been quietly working away on forums. We are loaded them to our test site - different from the active site. We would like to have some members help us test the heck out of them so we can find any bugs that might be there before we push it to the main site. If you are interested please e-mail webmaster(at)arfortytwo(dot)org with "I wanna test!" as the subject. We'll send you information later this week.

Thanks for the help.

Monday, April 12, 2010

Art Forty-Two Anniversary Swap

Hello Members!

Art Forty-Two is going to reach its one-year anniversary in a little over a month.

Our next swap will celebrate that and the community we've started here.
(Check out the project page http://www.artfortytwo.org/projects/161)

If there are enough participation we will create a Year One Anniversary book on Blurb.com. Proceeds going to support the site.

Instructions:

1. Create a piece with a mailart, community theme
2. Make either an ATC or a 4x4
3. Send it in and get art back!

Fishy 2 x 2

This was our latest site hosted swap. The returns were all fantastic as usual and a big thanks to those who participated. The next swap will be up soon. Happy trading.


Pat Jones


Nicci


Katina


Ginnybelle


Faithmarie


Cellissimo

Wednesday, March 31, 2010

How to make Marble Paper


Materials
Liquid starch
Water color paper
Acrylic paint
Paint brush
Paper towels
Shallow container (big enough for your paper)

• Fill the shallow container about half way with liquid starch.
• Water down the acrylic paint so it is a little runny.


• Use the paint brush to drip the paint onto the starch


• Swirl the paint so the colors are slightly mixed (try not to over mix)
• Gently place the paper on top of the starch and run your hand smoothly over the back of the paper, pressing it down slightly.
• Let the paper set in the starch for 30 seconds and or so and then gently pick up the paper.
• Let the paper set for about 5 or ten minutes face up and then run it
under tap water to rinse off excess starch and paint.
• Pat the paper dry and then set aside to air dry completely.

Saturday, March 20, 2010

Handmade Paper tutorial from Nicci

Hello Members! We received another fun technique from one of our members. Nicci has shared a fun handmade paper technique that creates unique final product.

---


orange spotty handmade paper
Swapped on Art42: (http://www.artfortytwo.org/projects/89) - Handmade Paper Swap

In order to make the handmade paper above, you need cardstock (white), watercolor, thinned down glue or mod podge, acrylic paint, gesso, and found papers with text.

handmade paper tutorial

1) First, apply rolled up tape to the back of your cardstock (or bristol board), and affix to a surface. In this case, I used folded up boxes. Apply watercolor to your paper in a streaky wash. It will still warp a little as it dries, but taping it down on the back helps minimize this.

handmade paper tutorial- step 2handmade paper tutorial - image 5

2) Cut up your tissue paper into circles which are slightly larger than circles of cut up paper with text on it. You can use dictionary pages or pages from a novel for your text. Just freehand cut your circles. They don't have to be perfect. I folded papers over several times and cut out multiple circles at once. Apply with mod podge or thinned down white glue. brush some over the top. Apply one circle or tissue over. Apply mod podge over that as well. (Tip: if you brush too many times over the wet tissue, it will tear. If it does, simply apply another circle of tissue and be more careful with that one!)

handmade paper tutorial- step 3

3) Step 3 is optional. If you would like to tone down the color of your tissue a little, apply a layer of white tissue over the color after refreshing the mod podge on the color (you can wait until it dries, or apply when still wet, so long as you're sure you add more glue between the two pieces. Then, apply glue over the white so it seals down well. You can also trap threads or ephemera between the layers of tissue for added interest. (Have scrap threads from sewing projects? Those are perfect!)

As you can see from the photo, a wet brush is perfect for picking up tissue paper circles. It makes the process easy and fast!

handmade paper tutorial - step 4

4) Once you've finished your dots, with or without the optional white layer or ephemera, allow them to dry. This should only take a few minutes.

handmade paper tutorial - step 5

5) Mix acrylic paint into a nice creamy consistency. Use a color similar to your tissue color, but slightly lighter or darker. Apply with a brush in loose circles around the tissue. Have fun with this! It doesn't have to be exact. In fact, it looks better if it's not!

handmade paper tutorial - step 6

6) Mix a little gesso with water, unless it's already a creamy consistency. Repeat the process of applying circles. I like to swoop them on fast so they have a little extra energy to them. Again, you don't have to worry about perfection here. It's just for fun, and looks better streaky.

Allow this to dry, then cut up and use in other projects, or use them for ATC bases!

I received a paper similar to this from a paper swap a few years ago (from Kirsten W. - http://www.flickr.com/photos/kirstenwilliamson/), and made a small handmade book with it. This stuff makes a pretty nifty cover. Below you can see what her paper looked like, and what I did with it!:

orange spots book - cover

xox nicci
(http://www.artfortytwo.org/profiles/nicci)
Come join some swaps!

----
If you have a technique you would like to share with the rest of the Art Forty-Two members please send it to webmaster@artfortytwo.org!

Sunday, March 7, 2010

Very Late: New Year Resolutions

Way back in January, (I know, can you believe it is March ALREADY!), the site hosted a New Year Resolution ATC swap. We had some fantastic resolutions for 2010. I am quite tardy in posting the images for this swap. I'm sure FaithMarie - who is in charge of the current site-hosted Fish 4x4 swap - will post the images much sooner than three months after the end of the swap. Now, with out more carrying on....

Chy Marshal (Mecachy)


Kathy Cawthon


K. Marshall (Kage)


Lucy Mannion


P. Marshall (PoeMars)


You all inspire me. I love seeing what you all come up with!

EmpressDragon

Tuesday, February 23, 2010

Cereal Box Background Technique

One of our members sent us this great technique for creating interesting and textured backgrounds for your ATCs (or really, anything you wanted). Mary (Tannermom) writes:

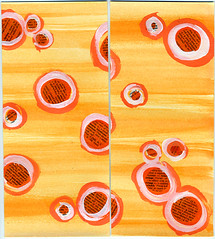
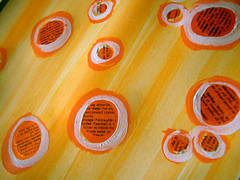
One of my favorite techniques for making ATC's is to start with a "Motherboard" collage, then cut the board into the 2-1/2 x 3-1/2" sizes for my ATC's.

You will be happily surprised at the wonderful backgrounds that come out of this technique.

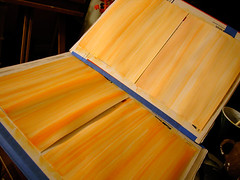
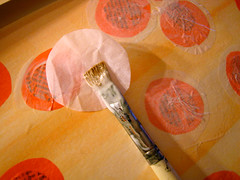
1.) Start with a piece of 8" x 12" (or any other like size) of light cardboard (I use cereal boxes) or heavy paper.

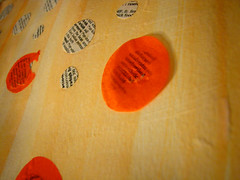
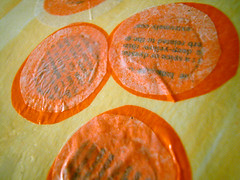
2.) Glue tissue paper, scrapbook pieces, string, and little things cut out of magazines to make one big collage. There does not have to be a theme yet, just use what materials you have.

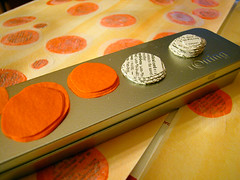
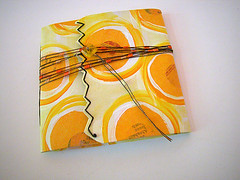
3.) Cut it into the size for your ATCs.

On top of your background, you can add more embellishments to finish your ATC for whatever project you need them for.

Confused at this point? Please don't hesitate to contact me; I'll be glad to help.

Mary (tannermom)


Thanks Mary! You have inspired us with a great new way to create fantastically textured backgrounds.

If you have a technique you would like to share with Art Forty-Two members e-mail us at webmaster@artfortytwo.org.